Write a sample plugin and how to register a plugin.
Hi All,
A plug-in is custom business logic (code) that you can integrate with Dynamics 365 CE to modify or augment the standard behavior of the platform.
Create a plug-in project
2. In the project properties, select the Signing tab and select the Sign the assembly checkbox.
Register plug-in:
2. Goto PluginRegistration folder and Click on PluginRegistration.exe application type file.
A plug-in is custom business logic (code) that you can integrate with Dynamics 365 CE to modify or augment the standard behavior of the platform.
Create a plug-in project
You need to use Visual Studio to write a plug-in. Use these steps to write a basic plug-in.
1. Open Visual Studio 2017 and open a new Class Library (.NET Framework) project using .NET Framework 4.6.2
The name used for the project will be the name of the assembly. This tutorial uses the name BasicPlugin.
2. In Solution Explorer, right-click the project and select Manage NuGet Packages… from the context menu.
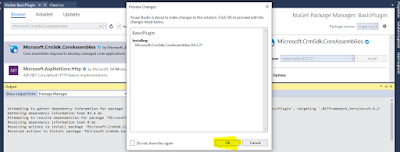
3. Select Browse and search for Microsoft.CrmSdk.CoreAssemblies
install the latest version.
click on OK
click on I Accept
4. In Solution Explorer, right-click the Class1.cs file and choose Rename in the context menu.
Rename the Class1.cs file to PreCreate_Contact_SetDefaultCreditLimit.cs.
5. When prompted, allow Visual Studio to re-name the class to match the file name.
Edit the Class file to enable a plug-in:
1. Add the following using statements to the top of the PreCreate_Contact_SetDefaultCreditLimit.cs file:
using System.ServiceModel;
using Microsoft.Xrm.Sdk;
2. Implement the IPlugin Interface by editing the class.
If you just type : IPlugin after the class name, Visual Studio will auto-suggest implementing a stub for the Execute Method.
public class PreCreate_Contact_SetDefaultCreditLimit: IPlugin
{
public void Execute(IServiceProvider serviceProvider)
{
throw new NotImplementedException();
}
}
3. Replace the contents of the Execute method with the following code:
IPluginExecutionContext context = (IPluginExecutionContext)serviceProvider.GetService(typeof(IPluginExecutionContext));
ITracingService tracing= (ITracingService)serviceProvider.GetService(typeof(ITracingService));
if (context.InputParameters.Contains("Target") && context.InputParameters["Target"] is Entity)
{
try
{
Entity entity = (Entity)context.InputParameters["Target"];
Money creditlimit = new Money(1000);
entity.Attributes["creditlimit"] = creditlimit;
}
catch (InvalidPluginExecutionException ex)
{
tracing.Trace("PreCreate_Contact_SetDefaultCreditLimit: {0}", ex.ToString());
throw;
}
}
About the code:
- The ITracingService enables writing to the tracing log. You can see an example in the final catch block
- The IPluginExecutionContext provides access to the context for the event that executed the plugin
Added business logic:
The plug-in will add the contact Creditlimit by default 1000 I have set this before the record creation
Build plug-in
In Visual Studio, press F6 to build the assembly. Verify that it compiles without error.
***Sign plug-in***
1. In Solution Explorer, right click the BasicPlugin project and in the context menu select Properties.
2. In the project properties, select the Signing tab and select the Sign the assembly checkbox.
3. In the Choose a strong name key file: dropdown, select <New…>.
4. In the Create Strong Name Key dialog, enter a key file name and deselect the Protect my key file with a password checkbox. For now password is not required.
5. Click OK to close the Create Strong Name Key dialog.
6. In the project properties Build tab, verify that the Configuration is set to Debug.
7. Press F6 to build the plug-in again.
8. Using windows explorer, find the built plug-in at: \bin\Debug\BasicPlugin.dll.
1. To register a plug-in, you will need the plug-in registration tool, which is download from the following link:
You will find the tools in the following folders:
[Your folder]\Tools\ConfigurationMigration
[Your folder]\Tools\CoreTools
[Your folder]\Tools\PackageDeployment
[Your folder]\Tools\PluginRegistration
Connect using the Plug-in Registration tool
Click Create new Connection to connect to your instance.
Make sure Office 365 is selected. If you are connecting using a Microsoft account other than one you are currently using, click Show Advanced.
3. Enter your credentials and click Login.
4. If your Microsoft Account provides access to multiple environments, you will need to choose an environment.
5. It opens following window.
Register assembly:
6. According to above window, in the Register drop-down, select New Assembly.
7. In the Register New Assembly dialog, select the ellipses (…) button and
8. Browse the assembly you built in the previous step and click Open.
9. For Office 365 users, verify that the isolation mode is Sandbox and the location to store the assembly is Database.
10. Click Register Selected Plug-ins.
11. You will see a Registered Plug-ins confirmation dialog
12. Click OK to close the dialog and close the Register New Assembly dialog.
13. You should now see the (Assembly) BasicPlugin assembly which you can expand to view the (Plugin) PostCreate_Contact_SetDefaultCreditLimit plugin.
Register a new step:
1. Right-click the (Plugin) BasicPlugin.PreCreate_Contact_SetDefaultCreditLimit and select Register New Step.
2. In the Register New Step dialog, set the following fields:
Message > Create
Primary Entity > contact
Event Pipeline Stage of Execution > PreOperation
Execution Mode > Synchronous
3. Click Register New Step to complete the registration and close the Register New Step dialog.
4. You can now see the registered step.
Finally create a record in the contact form with mandatory fields.
Back-end our plugin will trigger and assign CreditLimit to 1000 by default, before creating the record.
Note: this plugin will trigger only on Create trigger of contact entity.
Please try it once and add comment if any thing wrong.
Best Regards,
Pavan Kumar K.


Comments
Post a Comment